
Stepwise Guide (Hinglish) #
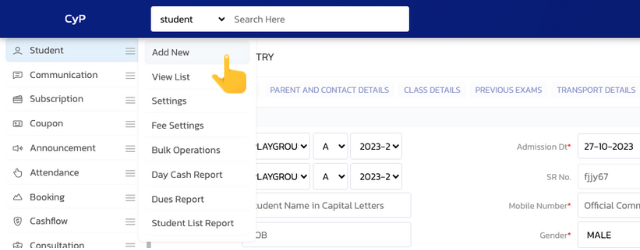
- Apne Udyogx ke portal par login karein phir ‘Student > Add New’ page par jaayein.
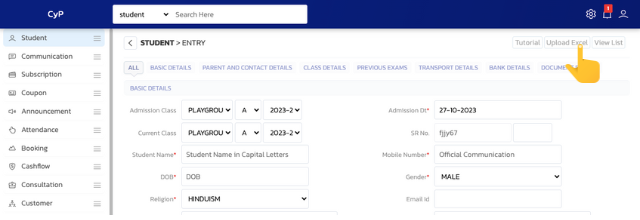
- Upar top right par diye ‘Upload Excel’ button par click kijiye.
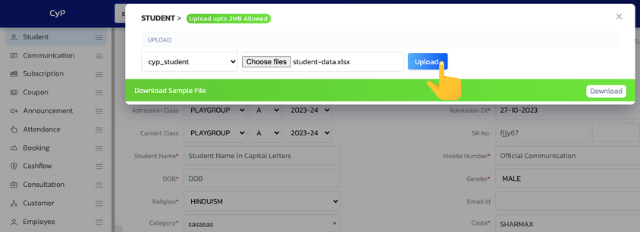
- Upload block me sample file download karne ka option ayeg use click karke sample file download karein. (Download Sample Excel File)

- Sample file par jo bhi column names hai uske according hi apna data prepare karke add karein. Column names me koi changes nhi karne hain apko sirf data add karna hai aur jo data available nhi hai unhe blank chhod sakte hai.
- Student Name, Father Name, Current Class, Admission Class, Current Section, Admission Section, Current Session, Admission Session, Phone Number jarur dalne ki koshish karein jisse aap software properly use kar payein. Incomplete data hone par par software use karne me asuvidhaa hogi.
- Poore institute ke students ka data excel ki first sheet me hi add karein. Software sirf excel ki first sheet se hi data pick karta hai baki sheets read nhi ki jaati hai. (Download Excel File with Sample Data)
- Data prepare hone ke baad aap excel upload kar dein (in option provided in Step 2).
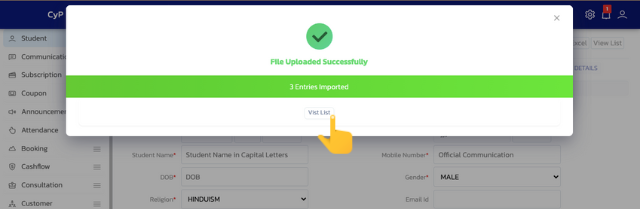
- Data successfully upload hone ke baad ek confirmation show hoga aur students list aur reports me show hone lagenge.
Stepwise Guide (English) #
- Login to your UdyogX portal and then go to ‘Student > Add New’ page.
- Click on the ‘Upload Excel’ button on the top right.
- There is an option to download sample file in the upload block. Click on it to download the sample file. (Download Sample Excel File)
- Whatever column names are there on the sample file, prepare your data and add them accordingly. You do not have to make any changes in the column names, you only have to add data and the data which is not available can be left blank.
- You must try to enter Student Name, Father Name, Current Class, Admission Class, Current Section, Admission Section, Current Session, Admission Session, Phone Number so that you can use the software properly. It would be difficult to use the software when there is incomplete data.
- The data of students of the entire institute will be added to the first sheet of excel. Software only picks data from the first sheet of excel and the rest of the sheets are not read. (Download Excel File with Sample Data)
- After preparing the data, you can upload excel (in option provided in Step 2).
- After successfully uploading the data, a confirmation will be shown and will start showing in the students list and reports.
चरणबद्ध मार्गदर्शिका (हिंदी) #
- अपने UdyogX पोर्टल पर लॉगिन करें फिर ‘Student> Add New’ पेज पर जाएं।
- ऊपर दाईं ओर ‘Upload Excel’ बटन पर क्लिक करें।
- अपलोड करें, ब्लॉक मी सैंपल फाइल डाउनलोड करें का विकल्प आएगा, क्लिक करके सैंपल फाइल डाउनलोड करें। (Sample Excel फ़ाइल डाउनलोड करें)|
- सैंपल फ़ाइल पर जो भी कॉलम नाम है उसके अनुसार अपना डेटा तैयार करके जोड़ें करें। कॉलम के नाम में कोई परिवर्तन नहीं किया गया है, आपको केवल डेटा जोड़ना है और जो डेटा उपलब्ध नहीं है उन्हें खाली छोड़ दिया गया है।
- छात्र का नाम, पिता का नाम, वर्तमान कक्षा, प्रवेश कक्षा, वर्तमान अनुभाग, प्रवेश अनुभाग, वर्तमान सत्र, प्रवेश सत्र, फोन नंबर जरूर डालें की कोशिश करें आप सॉफ्टवेयर का उचित उपयोग करें। अधूरा डेटा होने पर सॉफ्टवेयर का उपयोग करने पर असुविधा होगी।
- पूरे संस्थान के छात्रों का डेटा Excel की पहली शीट में ही जोड़ें। सॉफ्टवेयर सिर्फ Excel की पहली शीट से ही डेटा पिक करता है बाकी शीट पढ़ने के लिए नहीं जाती है। (Sample डेटा के साथ Excel फ़ाइल डाउनलोड करें)
- डेटा तैयार होने के बाद आप Excel अपलोड कर दें (चरण 2 में दिए गए विकल्प में)।
- डेटा सफलतापूर्वक अपलोड होने के बाद एक पुष्टिकरण शो होगा और छात्रों की सूची और रिपोर्ट में शो होने लगेंगे।


